Saturday, July 26, 2008

Pumpkin House Progress...

Slowly but surely my Pumpkin House project is coming along. I was FINALLY able applique down the vines and fuse on the leaves and berries. Blanket stitching will wait until soccer season starts - so I'll have something to do while waiting for my darlings to finish their practices. Here's how it looks so far:

Now I need to work on the pumpkin stems for the middle border. Then it'll be time to add all of the borders. I think I can... I think I can... I think I can...

Monday, July 14, 2008

Tutorial - Applique with Fusible Interfacing

Still busy working on my Thimbleberries Pumpkin House (have the fences all assembled) so now it's time for the applique. I've been preparing the berries and leaves and I thought I'd give a little tutorial on how to applique using fusible interfacing. I saw Eleanor Burns demonstrate this method on a Simply Quilts episode and I've been using it ever since.

You'll need fusible interfacing, of course. I prefer a medium weight because it will need to withstand some poking. (A lightweight one I bought would shred at the slightest tug - so test out a small corner before you buy.) I am using a charcoal color interfacing because my background piece is black. Here's a photo of the fusible side:

And a photo of the non-fusible side (with the applique shape traced onto it). The interfacing is very thin and I was able to trace the leaf without a lightbox or holding it up to a window.

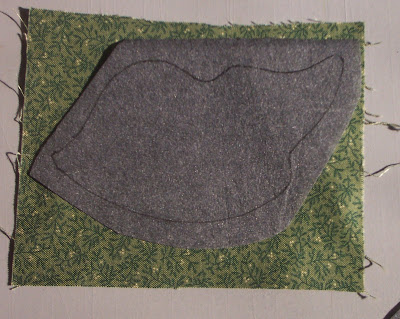
Next, put the applique fabric together with the interfacing, so that the fusible dots touch the right side of the fabric. Sew on the traced line using a tight stitch (like 1.5) and a thread that matches either the applique fabric or the interfacing. In this case, I used black.

Once it's sewn, trim the seam allowances using pinking shears. This works out really well - and saves you from clipping the curves of the piece. After it's been trimmed, make a few cuts in the center of the interfacing as shown. Be careful NOT to cut the applique fabric!

Finally it's time to turn the right side of the fabric through that cut in the interfacing. You may need to pull at it a bit. I use my Purple Thang to round out my curves and to make my points sharp, but Eleanor uses a bodkin. Either way, fuss with it a bit until you get it nice and smooth - like my leaf below:

Then, position the shape on the background fabric and, following the manufacturer's instructions for the interfacing, press in place. Here's a photo of another piece where I used this same method. The stitches are all done by hand using perle cotton. See how the applique puffs up a bit? That seems to help the stitches lay nicely around the outer edge.

Try it out sometime - you may like it!

*** A special thank you goes out to Peggy for sending me her leftover green fabric for my vines. You're a lifesaver! I'm wondering if my bias strips ever made it out of that garbage bag in Minnesota! LOL

Thursday, July 10, 2008

Sidetracked...

Okay, so I didn't do anything with those Fat Quarter 5 Stripe blocks... I was too busy cooking up a challenge for Peggy. As she mentioned last night, each of us will be working on our Pumpkin House tops that are in various stages. Here's a photo of my UFO, just after taking it out of the bag.

Now, Peggy thinks SHE's bad, having started the project back in Aug/Sept 2007... Shhhh, don't tell her, but I began mine back in September also - 2004! LOL! And I have not one..... not two... but THREE of these patterns! You see, I bought it when I first saw it at my LQS, and then I signed up for the class at the MSCS retreat - so the pattern was included with the class. Now, how did I get the third one, you ask? Well, I forgot to pack either of my two patterns in my luggage before flying off to Minnesota, so I needed to buy another one to use during my class! Stupid, right? You bet...

But that wasn't even the worst of it... During class I got a little sidetracked and started chatting and roaming around the room, leaving my project near my sewing machine. Class ended at 4:30pm, and the hotel staff quickly began transforming the room for the party to be held later that night. I guess my pile of pieces looked like garbage to them, because that's where I found my project! Fortunately, it was in a bag with 'clean' trash - but still... I learned my lesson after that - roam around during class all you want, but make sure you're back in your spot by the end of class! LOL

Finished!

Whoo hoo!! I was able to finish these two pint size Alpine Star quilt tops last night, JUST before my Thimbleberries Club meeting. They are slightly different and were made from fabrics in my stash. Hopefully my secret swap partner won't guess that one of these is for her!

Maybe I ought to work on that Fat Quarter 5 Stripe... I've already assembled the twelve 15.5" blocks and just need to make the sashings and prepare the border. We'll see how much gets done today ;)

Wednesday, July 9, 2008

Remember me?

Yes, I'm a very, very, VERY bad blogger - disappearing for months... Shame on me! I didn't work on ANY quilt projects and spent most of my time working and just 'being Mom'. I would've bored you with my tales of (seemingly endless) softball games, baseball games, track meets, church activities, band concerts, graduation ceremonies, etc. So it was good that I didn't blog, right??? LOL

It took some 'virtual' quilting to get me back in the swing of things. Kairle, who is in charge of our online Thimbleberries group, asked me to help her with one of the swaps planned for our Christmas in July event. I started playing around with the block design on my computer using CorelDraw and came up with these:

The quilt is called "Ring Toss" and is from the Thimbleberries book My Best. I used images of Christmas Punch fabrics that I had saved from a distributor's website in order to color the blocks but, after seeing the fabrics in person, I realized how inaccurate they are. The red I used in the block is actually much brighter and the gold outer ring is more faded. Disappointed, I decided to check my stash - and came up with a nice combination of vintage TB fabrics that should work nicely. Stay tuned!

I've also begun working on my other Christmas in July project - a swap of pint-size (24" square or less) quilts. Yesterday I was able to finish cutting out two of these Christmas quilts (one for my partner and one for me) as well as the pint size Pumpkin House project in the new Pint Size Traditions II book. There are TONS of tiny pieces - but it's amazing how little fabric is needed to make these adorable quilts.

I thought I'd also show you part of my workspace. Now, I'm not lucky enough to have a dedicated quilting room/studio like many of you, so I have to make do with what I have. Here's MY cutting area:

Looks a lot like a kitchen counter and cabinets, right? Well, it is! LOL The open cabinet is a nice place to put my book while following cutting directions, and the counter is the perfect height for me for cutting. I just have to make sure that I clean up everything before it's time to make dinner and do the dishes...

Thanks for stopping by!